
How To Order & Install Pullout Shelving
Install your pullout shelving and save money by using parts that you assemble and install yourself.
- Pullout shelf -- We recommend the Special Solid Birch rollout shelf, with the scoop cut, "Galley" Handle
- Drawer Slides -- We suggest a Blum concealed undermount or full extension, ball-bearing slide of appropriate length to fit your cabinet
- Shelf Mounting Brackets -- Optional use of these shelf mount brackets allow for mounting your full extension drawer slides directly to a shelf or cabinet base.
- Locking Shelf Clips -- Using one of these locking shelf clips will keep your cabinet's moveable shelves from "tipping" when you pull your rollout shelf forward.
- Power drill/driver -- A power drill/driver will be helpful for most steps of your installation and is a necessity for other steps of installations.
- Small level -- A small torpedo type level with magnetic pad is recommended for leveling if attaching your drawer slides directly to your cabinets. The level will also be helpful if you have a "half" shelf to support the rear of your pullout shelf and you have to attach the front of the slide to the cabinet. The level will not be necessary if your shelving is "full depth" and runs from the front opening to the rear wall.
- Phillips screw driver -- You will use the phillips head screw driver to attach the shelf mounting brackets to your drawer slides. You may also choose to use the screw driver to hand tighten other screws used in the installation, instead of using your power drill/driver.

Determine Pullout/Rollout Shelf Installation Method
(click on images below to enlarge)

| Base cabinet - no shelf | Base cabinet - half depth shelf | Base cabinet - full depth shelf |
|
|
|
|
| Double door cabinet - not divided | Double door cabinet - divided | Double door w/shelves - divided |
|
|
|
|
| Double door pantry - no shelves | Double door pantry - not divided | Double door pantry - divided |
|
|
|
|
| The examples shown above are not meant to represent all types of cabinets. These examples are designed to show "typical" cabinets for standard installations, your installation may require more work. The installation style recommendations below also are not all inclusive and may not work in all situations. You can modify your installation to fit your particular needs. | ||


| For all instructions below, the cabinet may have no shelves, may have shelves that are fixed permanently or the shelves may be adjustable by moving shelf pegs/supports. One of the mounting methods below will work for all of the cabinet styles above. |
Cabinet with half depth shelf:

- Use 4 "L" brackets for mounting the bottom pullout/rollout shelf to the base deck shelf. Be sure to allow for any obstructions such as hinges.
- Use 2 "L" brackets for mounting the rear of the shelf to the middle or upper shelf. Secure the front of the pullout/rollout shelf in the same manner as a drawer box by attaching the front of your drawer slides directly to the face frame edge.
Cabinet with full depth mid shelf:

- Use 4 "L" brackets for mounting the bottom pullout/rollout shelf to the base deck shelf. Be sure to allow for any obstructions such as hinges.
- Use 4 "L" brackets for mounting the middle or upper pullout/rollout shelf to the surface of the shelf. Be sure to allow for any obstructions such as hinges. Be sure to secure the rear of the shelf if it is not permanently affixed to the cabinet. You can purchase locking shelf clips or you can put a screw into the shelf. This will prevent the shelf from "tipping" or moving when you pull the pullout/rollout shelf outward.

- Use 4 "L" brackets for mounting the bottom pullout/rollout shelf to the base deck shelf. Be sure to allow for any obstructions such as hinges.
- For Pantry Unit: Use 4 "L" brackets for mounting the upper pullout/rollout shelf to the upper opening shelf (if this is a two opening pantry). Be sure to allow for any obstructions such as hinges.
- The middle shelves will be mounted by either:
- Attach the pullout/rollout shelf directly to the side walls. Depending on the type of cabinet, you may need to use spacers with the drawer slides to allow for faceframe or other obstructions. If you are going to use spacers, determine the thickness needed for clearance and select the proper size spacers.
- Secure the pullout/rollout shelf in the same manner as a drawer box by attaching the front of your drawer slides directly to the face frame edge and the rear of the slides will be held using a rear mounting bracket mounted to the back wall of the cabinet.
View the diagrams for how to measure and select your installation hardware

Obtaining Measurements

To obtain measurements for pullout/rollout shelving, you will have to determine the actual width of the pullout/rollout shelving and the width added by any hardware or slides.
The measuring process will be broken down into three steps:
- Decide where the shelves will be located. At this time, you can see if your shelves will interfere with any other cabinet parts such as hinges.
- Obtain the "clear opening" where you want to install your pullout/rollout shelf. The "clear opening" will be the total unobstructed opening where you intend to install your pullout/rollout shelf.
- Now that you have the clear opening dimensions, you can make the necessary adjustment in width for your selected type of pullout/rollout shelf slide. Shown below are the three most popular type slide hardware types and the adjustments you will have to make.
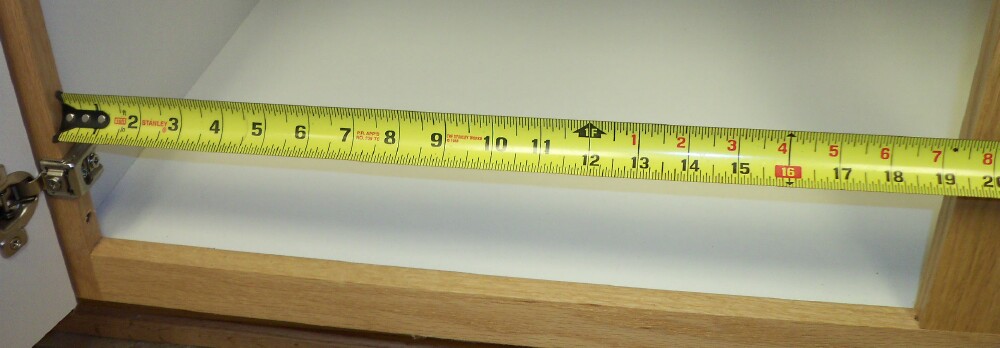 |
| The measurement shown above will be fine if the installation is going to be at the mid level and not where a hinge is located. The example above shows a 19 1/2" clear opening where there is not a hinge. |
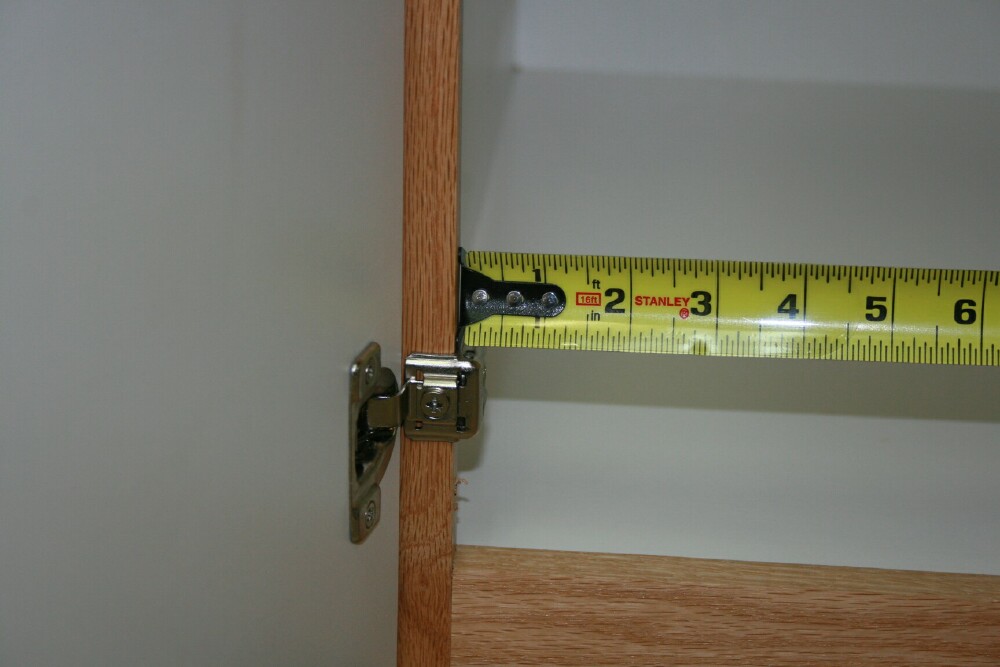 |
| If you are going to place the tray where a hinge is located, subtract the hinge obstruction from your opening width. As shown above, the hinge takes up 1/4" of the opening width, so you will subtract 1/4" from the width of the opening. In this example, where the hinge is, the clear opening is 19-1/2"- 1/4" = 19-1/4" |
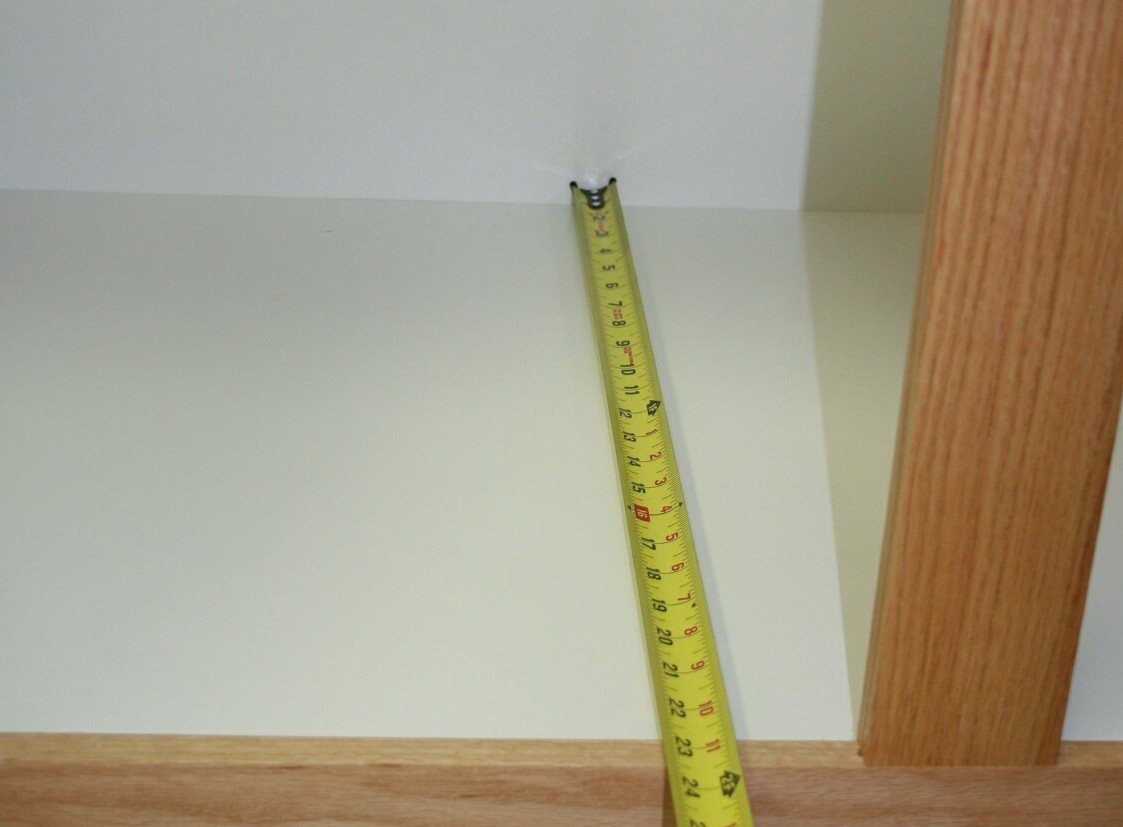 |
| Measure from the back wall to the inside of the front face. Example above shows 22-3/4" |
| Special Note: If you are using the 4 "L" brackets and mounting to a full depth shelf, it is recommended that a further reduction of 1/4" be made. This will allow you a 1/8" gap on each side for installation. |
| Pullout/Rollout Shelf Dimensions Without and With Hardware |
 |
| Picture above shows the finished width of the actual pullout/rollout shelf is 15" |
 |
| Picture above now shows the 15" pullout/rollout shelf with the full extension, ball bearing slides attached and is now 16-1/16". We recommend 16-5/16" clear opening width to install this pullout/rollout shelf. |

Pullout/Rollout Shelf Installation


To install pullout/rollout shelf with the 4 "L" brackets
View the diagrams for how to measure and select your installation hardware
The installation above that requires a bit of "finesse" is the 4 "L" bracket method. The easiest method for installing these is to:
- Install the brackets onto the drawer slides
- Install the drawer portion of the slides onto the pullout/rollout shelf (see this video for help), then re-assemble the slide with the pullout/rollout shelf so that you have the rollout/pullout with the "L" bracket and slides attached.
- Set the entire unit on the shelf where you wish to install it
- Make sure that you are lined up to avoid hinges or other obstructions
- Make sure that you are set back so that your pullout/rollout will not be hit by the closed door.
- Gently press down and slide the pullout/rollout shelf forward enough to expose one or both of the rear brackets and secure one of both of the brackets with a screw in one of the holes. After verifying that you are still lined up the way you wish, pull the pullout/rollout forward and expose the front brackets. Put in one more screw in each of the brackets and verify that your pullout/rollout shelf is still lined up the way you wish. If so, then go ahead and tighten the screws and put at least one more screw in each of the brackets, securing your pullout/rollout shelf to the floor or shelf.
Additional information being added as needed, check back or give us a call for more information.


